
Baked Mac and Cheese Bites: Perfect Finger Food for Any Party
December 31, 2025
Cheese and Veggie Frittata: Easy, Healthy, and Flavorful
January 3, 2026
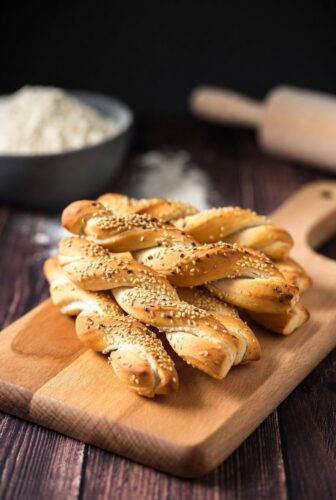
Imagine pulling a baking sheet out of the oven, the air instantly filling with the scent of toasted garlic, melted cheddar, and warm yeast dough. That’s the magic of homemade bread. While a full loaf can be intimidating, there is a simpler, cheesier path to carbohydrate bliss. Cheese twist breadsticks are the ultimate comfort food hack—they look impressive, taste incredible, and are surprisingly simple to make.
Whether you are looking for the perfect side dish for pasta night, a savory snack for a movie marathon, or an appetizer that will disappear in seconds at your next party, this recipe is your answer. These aren’t just breadsticks; they are twisted ribbons of dough hugging pockets of sharp cheese and herbs.
In this guide, we will walk through exactly how to make bakery-quality cheese twist breadsticks in your own kitchen. We’ll cover everything from the basic dough to creative variations that will keep your taste buds guessing.
Why You’ll Love This Recipe

Making bread can sometimes feel like a science experiment gone wrong. Yeast doesn’t rise, crusts get too hard, or the center stays gummy. Cheese twist breadsticks are forgiving. Because you are twisting the dough, you create layers that naturally puff up and become crispy, avoiding many common bread-baking pitfalls.
Plus, the texture is unbeatable. You get the crunch of a breadstick combined with the soft, pillowy interior of a cheese roll. It is a tactile food—fun to make and even more fun to pull apart and eat.
Ingredients You Will Need
Before we start twisting, let’s gather our ingredients. You likely have most of these in your pantry already.
For the Dough
- Warm Water: 1 cup (about 110°F/45°C). It should feel like warm bathwater, not hot tea.
- Active Dry Yeast: 1 packet (2 ¼ teaspoons).
- Sugar: 1 tablespoon. This feeds the yeast and helps the browning process.
- All-Purpose Flour: 2 ½ to 3 cups. You can also use bread flour for a slightly chewier texture.
- Olive Oil: 2 tablespoons, plus extra for greasing.
- Salt: 1 teaspoon.
For the Filling and Topping
- Shredded Cheese: 1 ½ cups. Sharp cheddar, mozzarella, or a blend works best. Grate it yourself for better melting!
- Parmesan Cheese: ½ cup, grated finely.
- Butter: 3 tablespoons, melted.
- Garlic Powder: 1 teaspoon.
- Dried Parsley or Italian Seasoning: 1 teaspoon.
Step-by-Step Instructions: Making Cheese Twist Breadsticks
This process is broken down to ensure success, even if you are a novice baker.
Step 1: Activate the Yeast
In a large mixing bowl or the bowl of your stand mixer, combine the warm water and sugar. Stir until the sugar dissolves. Sprinkle the yeast over the top and let it sit for about 5 to 10 minutes. You want to see a creamy foam form on the surface. If it doesn’t foam, your yeast might be old, and your breadsticks won’t rise.
Step 2: Mix the Dough
Once the yeast is foamy, stir in the olive oil and salt. Gradually add the flour, one cup at a time. If using a stand mixer, use the dough hook attachment on low speed. If mixing by hand, use a sturdy wooden spoon until the dough becomes too difficult to stir.
Step 3: Knead Until Smooth
Turn the dough out onto a lightly floured surface. Knead for about 5-7 minutes. You are looking for a dough that is smooth, elastic, and slightly tacky but not sticky. It should spring back when you poke it.
Step 4: First Rise
Lightly grease a large bowl with olive oil. Place your dough inside, turning it once to coat all sides in oil. Cover the bowl with plastic wrap or a warm, damp kitchen towel. Place it in a draft-free warm spot and let it rise until doubled in size, which usually takes about 1 hour.
Step 5: Roll and Fill
Punch down the risen dough to release air bubbles. Transfer it back to your floured surface. Roll the dough into a large rectangle, roughly 12×18 inches.
Brush half of the melted butter over the surface of the dough. In a small bowl, mix the garlic powder and dried herbs, then sprinkle this over the butter. Finally, spread your shredded cheese evenly over the dough, pressing it down slightly so it sticks.
Step 6: Fold and Cut
Fold the dough in half lengthwise (bringing the long edge up to meet the top long edge), enclosing the cheese like a book. You should now have a long, narrow rectangle. Using a pizza cutter or a sharp knife, cut the dough into 12 strips, each about an inch wide.
Step 7: Twist and Bake
Preheat your oven to 375°F (190°C). Line two baking sheets with parchment paper.
Take one strip of dough, holding one end in each hand. Twist the ends in opposite directions to create a spiral shape. Place the twisted stick on the baking sheet. Repeat with the remaining strips. Brush the tops with the remaining melted butter and sprinkle with Parmesan cheese.
Let them rest for another 15 minutes while the oven heats up. Bake for 12-15 minutes, or until golden brown and the cheese is bubbling.
Tips for the Perfect Cheese Twist Breadsticks
Even with a simple recipe, a few pro tips can elevate your baking game.
Grate Your Own Cheese
Pre-shredded cheese is coated with anti-caking agents like potato starch or cellulose. This prevents the cheese from clumping in the bag, but it also prevents it from melting smoothly. For the gooiest, stretchiest cheese pull in your cheese twist breadsticks, buy a block of cheddar or mozzarella and grate it yourself.
Don’t Over-Flour
When kneading and rolling, use only enough flour to keep the dough from sticking to the counter. Adding too much flour during the rolling stage can make the breadsticks tough and dry rather than soft and fluffy.
The Egg Wash Secret
If you want a deep, glossy golden-brown color, skip the top layer of butter before baking and use an egg wash instead. Whisk one egg with a tablespoon of water and brush it gently over the twists. You can still brush them with garlic butter after they come out of the oven for that signature flavor.
Storage and Reheating
These are best eaten fresh. However, if you have leftovers, store them in an airtight container at room temperature for up to two days. To reheat, wrap them in foil and place them in a 350°F oven for 5-10 minutes. The microwave tends to make them rubbery.
Creative Variations to Try
Once you master the classic recipe, it is time to experiment. The basic dough is a blank canvas for savory flavors.
Spicy Jalapeño Popper Twists
Add a kick to your snack by incorporating diced pickled jalapeños into the cheese filling. Swap the cheddar for cream cheese mixed with pepper jack. These spicy cheese twist breadsticks are perfect for game day appetizers.
Pesto Parmesan Twists
Instead of garlic butter inside the fold, spread a thin layer of basil pesto. Sprinkle generously with Parmesan and mozzarella. The green swirls look beautiful, and the basil flavor pairs perfectly with tomato soup.
Sweet Cinnamon Sugar Twists
Believe it or not, this dough works for sweet treats too. Skip the garlic and herbs. Brush the dough with butter and sprinkle generously with cinnamon and sugar. After baking, drizzle with a simple vanilla glaze. It’s like a deconstructed cinnamon roll.
Bacon and Gruyère
For a more sophisticated, savory option, use Gruyère cheese and crumbled cooked bacon. The smoky, salty bacon combined with the nutty flavor of Gruyère creates a rich, decadent twist that feels gourmet.
Serving Suggestions
What should you serve with your fresh batch of twists? While they are delicious on their own, dipping sauces take them to the next level.
- Marinara Sauce: The classic choice. Warm up your favorite jarred sauce or make a quick tomato basil dip.
- Ranch Dressing: A favorite for kids and adults alike, especially with cheddar twists.
- Garlic Butter Dip: Melt more butter with minced garlic and parsley for a double dose of garlic flavor.
- Beer Cheese Dip: If you are serving these at a party, a warm beer cheese dip turns this snack into a hearty appetizer.
Frequently Asked Questions (FAQs)
Here are answers to common questions about making cheese twist breadsticks.
Can I use store-bought pizza dough?
Yes, absolutely! If you are short on time, a tube of refrigerated pizza dough or a ball of dough from your local bakery works well. Just let it come to room temperature before rolling it out so it doesn’t shrink back. Follow the filling and twisting instructions as written.
Why did my cheese leak out?
Some cheese leakage is normal and creates delicious crispy bits on the pan (often called “frico”). To minimize it, make sure you press the cheese into the dough before folding. Also, try not to overstuff them. Sealing the edges slightly before twisting can also help keep the filling inside.
Can I freeze these breadsticks?
Yes. You can freeze them baked or unbaked.
- Unbaked: Flash freeze the shaped twists on a baking sheet, then transfer to a freezer bag. When ready to bake, let them thaw and rise on a sheet for about an hour before putting them in the oven.
- Baked: Allow them to cool completely, then freeze. Reheat directly from frozen in the oven at 350°F for about 10-15 minutes.
My dough keeps springing back when I roll it. What do I do?
This means the gluten is tight. Don’t fight the dough. Cover it with a towel and let it rest for 10 to 15 minutes. This allows the gluten strands to relax, making the dough much easier to stretch and roll.
Is active dry yeast the same as instant yeast?
They are similar but used differently. Active dry yeast needs to be dissolved in water first to “wake up.” Instant yeast (or rapid-rise yeast) can be mixed directly into the flour. If you use instant yeast, you can skip Step 1 and move straight to mixing, but make sure your water is still warm (120°F-130°F).
Final Words
Baking at home brings a sense of accomplishment that few other cooking tasks can match. There is something primal and satisfying about working with yeast, kneading dough, and watching it rise. These cheese twist breadsticks are the perfect entry point for beginner bakers and a reliable favorite for seasoned pros.
They are versatile, cost-effective, and infinitely tastier than anything you will find in the frozen aisle of the grocery store. Whether you stick to the classic cheddar and garlic version or experiment with pesto and bacon, the result is always a warm, golden, cheesy delight that brings people together. So, grab your flour, preheat that oven, and get ready to twist your way to snacking perfection.
