
Parmesan Crusted Zucchini Fries: Healthy & Cheesy Snack
December 7, 2025
Cheese-Stuffed French Toast: Sweet and Savory Morning Treat
December 7, 2025
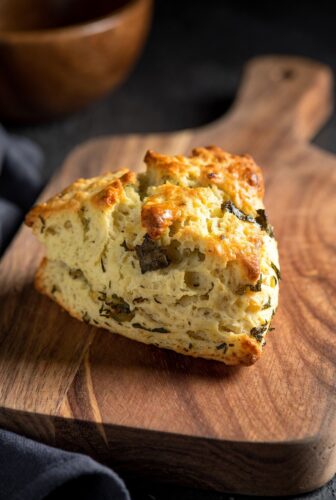
Scones often bring to mind sweet, fruity flavors served with clotted cream and jam. But the savory side of the scone family offers a world of comforting, versatile flavors that deserve just as much attention. Among the best of these are classic Cheese and Onion Scones. Fluffy, tender, and packed with the timeless combination of sharp cheddar and savory onion, these scones are a delightful treat that can elevate a simple soup, become the star of a brunch, or serve as the perfect afternoon snack.
Forget the dry, crumbly pucks you might have encountered in the past. A well-made savory scone is a thing of beauty: light on the inside with a slightly crisp, golden exterior. The sharp, salty taste of the cheese pairs perfectly with the subtle sweetness of cooked onion, creating a flavor profile that is both simple and deeply satisfying.
In this comprehensive guide, we will walk you through everything you need to know to master the art of making perfect Cheese and Onion Scones. We’ll cover the essential ingredients, a step-by-step method, and crucial tips to ensure a flawless bake every time. Get ready to add a new staple to your baking repertoire.
What Makes a Perfect Savory Scone?
Before diving into the recipe, it’s important to understand the key elements that contribute to a great scone. Unlike bread, which requires extensive kneading to develop gluten, scones are meant to be tender. The goal is a “short” crumb, which is achieved by keeping the butter cold and handling the dough as little as possible.
The magic of Cheese and Onion Scones lies in the balance of their ingredients. The fat from the butter and cheese creates a rich, tender texture, while the flour provides structure. The onion, whether fresh or cooked, adds moisture and a layer of aromatic flavor that cuts through the richness. When these elements come together correctly, the result is a savory bake that is anything but boring.
Ingredients You Will Need
The beauty of this recipe is its reliance on pantry staples. You likely have most of what you need already. Here’s a breakdown of the key components:
- All-Purpose Flour: The foundation of your scones.
- Cold Butter: This is non-negotiable. Cold, cubed butter is cut into the flour to create small pockets. As the scones bake, these pockets of butter melt and release steam, which creates the light, flaky layers.
- Sharp Cheddar Cheese: Don’t skimp on quality here. A good, aged sharp cheddar will provide a robust flavor that stands up to the other ingredients. Grate it yourself from a block for the best melt and taste.
- Onion: You have options here. Finely chopped chives or green onions offer a fresh, mild flavor. Alternatively, you can use a finely diced yellow onion that has been sautéed until soft and slightly caramelized for a deeper, sweeter taste.
- Buttermilk or Milk: Buttermilk provides a slight tang and helps create a very tender crumb. If you don’t have any, whole milk with a teaspoon of lemon juice or vinegar left to sit for a few minutes is a great substitute.
- Egg: One for the dough to add richness and another for an egg wash to give the tops a beautiful golden shine.
- Baking Powder: The primary leavening agent that gives the scones their lift.
- Sugar & Salt: A small amount of sugar balances the savory flavors, while salt is essential for enhancing them.
- Cayenne Pepper or Mustard Powder (Optional): A pinch of either can amplify the cheesy flavor and add a subtle warmth.
Step-by-Step Guide to Irresistible Cheese and Onion Scones

Follow these instructions carefully, paying close attention to the technique, and you’ll be rewarded with bakery-quality scones.
1. Prepare Your Flavors
First, decide on your onion. If using chives or green onions, simply chop them finely. If using a yellow onion, dice it small and sauté it in a little butter or oil over medium heat until soft and translucent, about 5-7 minutes. Let it cool completely before adding it to the dough. Adding warm ingredients will melt the butter prematurely.
Grate your cheddar cheese and set it aside.
2. Mix the Dry Ingredients
In a large mixing bowl, whisk together the all-purpose flour, baking powder, salt, and sugar. If you are using cayenne or mustard powder, add it here. Whisking ensures everything is evenly distributed.
3. Cut in the Cold Butter
Take your cold, cubed butter and add it to the flour mixture. Using a pastry blender, two knives, or your fingertips, cut the butter into the flour until the mixture resembles coarse breadcrumbs with some pea-sized pieces of butter still visible. Work quickly to prevent the butter from warming up. Those visible butter pieces are crucial for a flaky texture.
4. Add the Cheese and Onion
Gently stir the grated cheese and your cooled, prepared onions into the flour mixture. Make sure they are evenly distributed.
5. Form the Dough
Make a well in the center of your dry ingredients. In a separate small bowl, whisk one egg and the buttermilk together. Pour about three-quarters of this wet mixture into the well. Using a fork or a spatula, gently mix until a shaggy dough begins to form. Do not overmix. If there are still dry patches, add the remaining liquid a little at a time until the dough just comes together. The dough should be soft and slightly sticky, not wet.
6. Shape and Cut the Scones
Turn the dough out onto a lightly floured surface. Gently knead it just two or three times to bring it together into a cohesive ball—any more will make your scones tough. Pat the dough out into a circle about 1 inch thick.
Using a 2.5-inch round cutter, press straight down into the dough to cut out your scones. Do not twist the cutter, as this can seal the edges and prevent a proper rise. Place the cut scones on a baking sheet lined with parchment paper. Gently gather the scraps, re-pat the dough, and cut out more scones until all the dough is used.
7. The Finishing Touches
For a professional, glossy finish, whisk the remaining egg with a tablespoon of milk and brush it lightly over the tops of the scones. You can also sprinkle a little extra grated cheese on top before baking.
8. Bake to Perfection
Bake in a preheated oven at 400°F (200°C) for 15-20 minutes, or until the scones have risen and are a deep golden brown. The smell of baking Cheese and Onion Scones is one of the best kitchen aromas you can experience.
Tips for Scone Success
Scone making can be finicky, but these tips will help you avoid common pitfalls.
- Keep Everything Cold: Your butter, buttermilk, and even your mixing bowl should be cold. This is the golden rule of scone making.
- Don’t Overwork the Dough: Handle the dough as little as possible. Over-mixing develops gluten, which leads to tough, chewy scones instead of light, tender ones.
- Grate Your Own Cheese: Pre-shredded cheese is often coated in starches to prevent clumping, which can inhibit melting and affect the texture of your dough.
- Check Your Baking Powder: Baking powder loses its potency over time. To test it, drop a spoonful into hot water. If it fizzes actively, it’s good to go.
- Serve Them Warm: These scones are at their absolute best when served warm from the oven, perhaps with a generous smear of butter.
Variations on the Classic Recipe
Once you have mastered the basic Cheese and Onion Scones, feel free to experiment with other flavor combinations.
- Bacon and Cheddar: Add crumbled, cooked bacon along with the cheese for a smoky, savory twist.
- Jalapeño and Cheddar: For a spicy kick, add finely diced jalapeños (fresh or pickled) to the dough.
- Rosemary and Parmesan: Swap the cheddar for Parmesan and the onion for finely chopped fresh rosemary for a more herbaceous, Italian-inspired scone.
- Ham and Swiss: Diced ham and grated Swiss cheese make for a classic combination that is perfect for a savory brunch.
Frequently Asked Questions (FAQ)
Q: Can I freeze the scone dough?
A: Yes! Freezing is a great way to have fresh scones on demand. Shape and cut the scones, then place them on a baking sheet and freeze until solid. Transfer them to a freezer bag. You can bake them directly from frozen, adding a few extra minutes to the baking time.
Q: Why did my scones not rise much?
A: This could be due to a few factors. Your baking powder might be old, you might have overmixed the dough, or you may have twisted the cutter when cutting the scones, which seals the edges.
Q: Can I make these gluten-free?
A: You can, but it requires a good-quality gluten-free all-purpose flour blend that contains xanthan gum. The texture will be slightly different—often a bit more dense—but still delicious.
Q: How do I store leftover scones?
A: Store any leftover Cheese and Onion Scones in an airtight container at room temperature for up to two days. To refresh them, warm them in an oven or toaster oven for a few minutes to bring back some of their freshly baked texture. Avoid the microwave, as it can make them tough.
Final Words
Baking from scratch can seem intimidating, but recipes like this prove it doesn’t have to be complicated to be impressive. Cheese and Onion Scones are a testament to the power of simple, high-quality ingredients working in harmony. They are rustic, comforting, and incredibly versatile. Whether you enjoy them alongside a hearty stew, as part of an afternoon tea, or simply on their own with a bit of butter, they are sure to become a favorite.
So, roll up your sleeves, get your butter nice and cold, and fill your kitchen with the wonderful aroma of baking cheese and onion. This is one recipe that delivers satisfying results every single time, making any occasion feel just a little more special.
