
Pull-Apart Cheese Loaf: Gooey, Cheesy, and Delicious
December 23, 2025
Cheese Foam Iced Tea: Trendy and Refreshing Beverage Recipe
December 24, 2025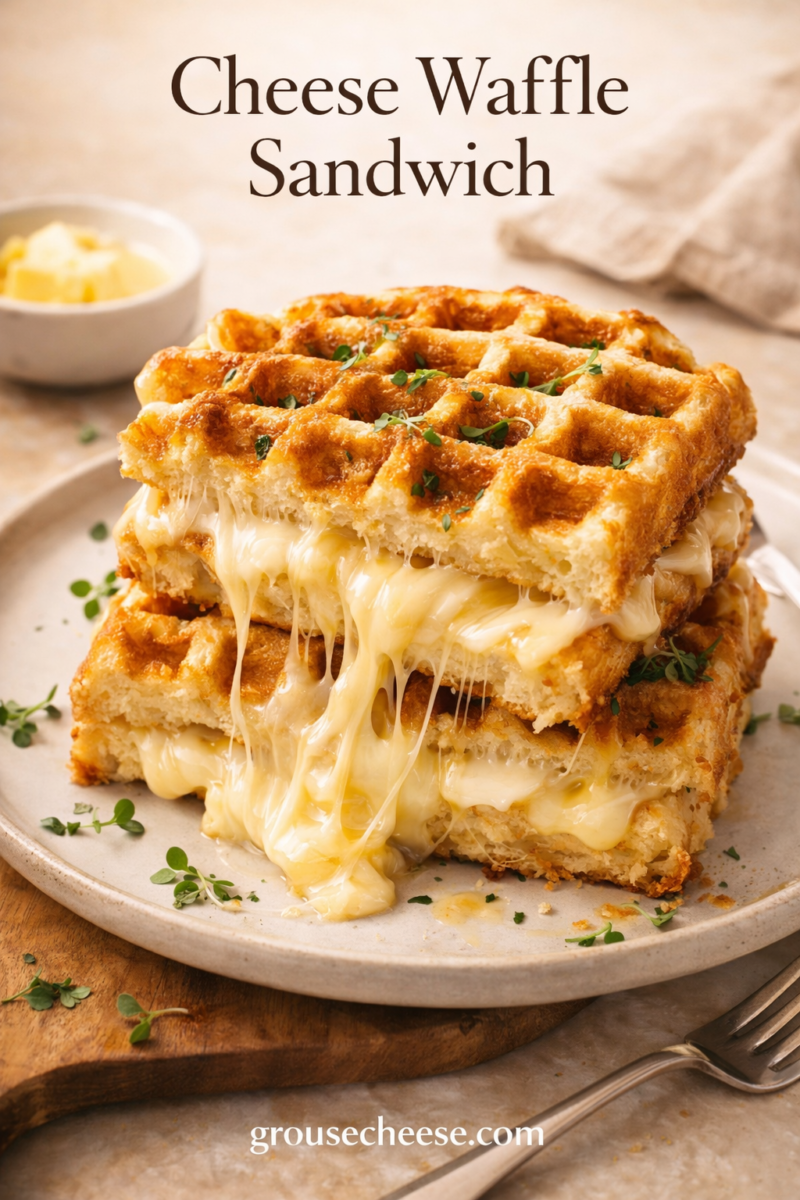
There’s a certain magic that happens when you combine the convenience of a sandwich with the delightful texture of a waffle. We often associate waffles with sweet breakfast syrups and berries, but the savory side of the waffle iron is a culinary landscape waiting to be explored. Enter the cheese waffle sandwich: a crispy, gooey, and utterly satisfying meal that bridges the gap between breakfast, lunch, and dinner.
If you are tired of the same old cold cuts or standard grilled cheese, this guide is for you. We are going to dive deep into the art of making the perfect cheese waffle sandwich, exploring everything from the basic technique to gourmet variations that will impress your taste buds. Get ready to dust off your waffle maker and discover one of the most versatile quick waffle recipes around.
Why the Cheese Waffle Sandwich Works
The concept of putting a sandwich in a waffle iron—often called “waffling”—isn’t just a gimmick. It actually enhances the sandwich-eating experience. The waffle iron applies heat from both sides, ensuring even cooking and melting the cheese rapidly. But the real secret lies in the dimples.
When you make a cheese waffle sandwich, the grid of the iron creates pockets of crispy bread (or batter) while sealing the edges. This prevents the melted cheese from leaking out too much, keeping the gooey goodness right where it belongs: inside the sandwich. The increased surface area also means more crunch in every bite, providing a satisfying contrast to the soft, melted interior. It’s a waffle iron sandwich revolution that turns a simple snack into a texture-rich meal.
Two Ways to Make a Cheese Waffle Sandwich
There are two primary schools of thought when it comes to creating this dish. Both result in a delicious cheese waffle sandwich, but they start with different foundations.
Method 1: The “Waffled” Grilled Cheese
This is the quickest method and perfect for using up leftover bread. essentially, you build a sandwich with sliced bread and cheese, butter the outside, and press it in the waffle iron instead of a frying pan.
Pros:
- Incredibly fast.
- Uses standard pantry ingredients.
- Creates an ultra-crispy crust.
Method 2: The Savory Waffle Batter
This method involves making a savory waffle batter—often incorporating cheese, herbs, or even bacon bits directly into the mix—and using two savory waffles as the “bread” for your sandwich.
Pros:
- Deeper, more complex flavor profile.
- Highly customizable batter (keto, gluten-free, etc.).
- Fluffy interior texture.
The Ultimate “Waffled” Grilled Cheese Recipe
Let’s start with the classic approach. This recipe transforms humble bread and cheese into a masterpiece of texture.
Ingredients:
- 2 slices of sturdy bread (Sourdough, thick-cut white, or brioche work best)
- 2-3 slices of your favorite cheese (Cheddar, Gouda, or Monterey Jack)
- 2 tablespoons unsalted butter, softened
- Optional fillings: thinly sliced ham, tomato, or fresh basil
Instructions:
- Preheat Your Iron: Plug in your waffle maker and let it heat up to a medium-high setting. If your iron doesn’t have temperature control, simply wait until the “ready” light turns on.
- Butter the Bread: Generously spread the softened butter on one side of each slice of bread. This is crucial for achieving that golden-brown color and preventing sticking.
- Assemble the Sandwich: Place one slice of bread, buttered side down, onto the hot waffle iron. Layer your cheese and any optional fillings on top. Place the second slice of bread on top, buttered side up.
- Press and Cook: Close the waffle iron lid firmly. Depending on the thickness of your bread, you might need to apply a little pressure to latch it, but don’t force it too hard or you’ll squash the bread flat. Cook for 3 to 5 minutes.
- Check for Doneness: Carefully lift the lid. The bread should be golden brown with distinct waffle marks, and the cheese should be visibly melted.
- Serve Hot: Carefully remove the cheese waffle sandwich with a silicone spatula (metal utensils can scratch the non-stick coating). Let it cool for a minute before slicing to avoid burning your mouth on the molten cheese.
Cheesy Waffle Ideas and Variations
Once you have mastered the basic technique, the possibilities are endless. Here are some creative cheesy waffle ideas to elevate your meal prep.
The “Pizza” Waffle Sandwich
Craving pizza but short on time?
- Bread/Batter: Use garlic butter on the outside of the bread.
- Filling: Mozzarella cheese, pepperoni slices, and a spoonful of thick marinara sauce (don’t use too much liquid sauce or it will get soggy).
- Dip: Serve with extra marinara on the side.
The Breakfast Waffle Sandwich
Start your day with a savory kick.
- Bread/Batter: Use a savory cheddar-chive waffle batter.
- Filling: A fried egg, a slice of American cheese, and crispy bacon or a sausage patty.
- Tip: If using the batter method, make the waffles first, then assemble the sandwich and press it briefly to melt the cheese.
The Caprese Waffle Press
A fresh, Italian-inspired twist.
- Bread: Ciabatta or sourdough.
- Filling: Fresh mozzarella slices, tomato slices, fresh basil leaves, and a drizzle of balsamic glaze.
- Note: Pat the tomato slices dry with a paper towel before adding them to prevent excess moisture.
The Keto “Chaffle” Sandwich
For those watching their carb intake, the “Chaffle” (cheese + waffle) is a game-changer.
- Batter: Mix 1 egg with ½ cup of shredded mozzarella cheese. Pour this mixture into a mini waffle maker to create two cheese-based waffles.
- Filling: Use these crispy cheese waffles as the buns for a turkey, avocado, and Swiss cheese sandwich.
Tips for the Perfect Waffle Iron Sandwich
Making a cheese waffle sandwich is easy, but a few pro tips can take it from good to great.
- Don’t Skimp on the Fat: Whether it’s butter, mayonnaise, or olive oil, coating the outside of the bread is essential. Mayonnaise actually has a higher smoke point than butter and creates an incredibly crisp, golden crust without burning as easily.
- Clean Your Iron: Cheese can be messy. If some cheese oozes out and gets stuck in the crevices, let the iron cool slightly (but is still warm) and wipe it out with a damp paper towel. Using a chopstick can help get into the grooves.
- Bread Selection Matters: Soft, airy sandwich bread tends to compress too much in a waffle iron, becoming dense and hard. Opt for denser, crustier breads like sourdough, rye, or artisan loaves that can stand up to the pressure of the iron.
- Shred Your Own Cheese: Pre-shredded cheese contains anti-caking agents that prevent it from melting smoothly. For the best cheese pull in your cheese waffle sandwich, buy a block and grate it yourself.
Serving Suggestions
A cheese waffle sandwich is hearty enough to be a meal on its own, but pairing it with the right side can balance the richness.
- Tomato Soup: The classic partner for grilled cheese works just as well here. The acidity of the tomato cuts through the rich cheese.
- Fresh Salad: A light arugula salad with a lemon vinaigrette provides a fresh, crunchy contrast to the heavy, warm sandwich.
- Pickles: A spear of dill pickle on the side adds a necessary salty, vinegary crunch that cleanses the palate.
Final Words
The cheese waffle sandwich is a testament to kitchen creativity. It proves that you don’t need fancy equipment or exotic ingredients to create a meal that is fun, delicious, and satisfying. Whether you are pressing a simple ham and cheese on sourdough or whipping up a complex savory batter, the waffle iron adds a unique texture that a frying pan simply cannot replicate.
So next time you are staring at a loaf of bread and a block of cheese, wondering what to make for lunch, remember the waffle iron tucked away in your cupboard. Plug it in, get creative, and enjoy the crispy, gooey perfection of a well-made cheese waffle sandwich.
Frequently Asked Questions (FAQs)
Q: Can I use a Belgian waffle maker for a cheese waffle sandwich?
A: Yes, absolutely! Belgian waffle makers have deeper pockets, which means you might need slightly thicker bread or more filling to ensure the plates make contact with the bread. The result will be a thicker, fluffier sandwich with deep wells for holding dipping sauces.
Q: My sandwich is sticking to the waffle iron. What did I do wrong?
A: Sticking usually happens for two reasons: not enough fat on the bread or the iron wasn’t hot enough. Make sure you generously butter (or mayo) the outside of the bread. Also, ensure the non-stick coating on your iron is intact. If it’s old, you might need to spray the iron with a little non-stick cooking spray before adding the sandwich.
Q: Is a cheese waffle sandwich just a panini?
A: It is similar, but distinct! A panini press usually has ridges that run in one direction, flattening the sandwich. A waffle iron has a grid pattern that compresses the sandwich in specific points while leaving “pockets” uncompressed. This creates a different texture—crispier in the wells and softer in the pockets—that distinguishes a waffle iron sandwich from a standard panini.
Q: Can I make these ahead of time?
A: While they are best eaten fresh for maximum crispiness, you can make them ahead. To reheat, avoid the microwave, as it will make the bread soggy. Instead, pop the sandwich back into the waffle iron for a minute or two, or use a toaster oven to revive the crunch.
Q: What are the best cheeses for melting in a waffle sandwich?
A: You want cheeses with a good melting point. Cheddar (mild or sharp), Gruyère, Fontina, Monterey Jack, and Mozzarella are excellent choices. Hard cheeses like Parmesan don’t melt as well on their own but add great flavor when mixed with a softer cheese.
Q: Can I make a sweet and savory cheese waffle sandwich?
A: Definitely! Try using Brie cheese with thinly sliced apples and a drizzle of honey, or cream cheese with strawberry jam on brioche bread. The waffle iron caramelizes the sugars beautifully.
