
How to Make a Smooth and Creamy Cheese Martini at Home
November 12, 2025
Grilled Cheese Sandwich Ideas: Creative and Delicious Recipes
November 12, 2025
There are few desserts as iconic or as deeply satisfying as a slice of genuine New York cheesecake. Known for its dense, rich, and impossibly creamy texture, this dessert stands apart from its lighter, fluffier counterparts. It’s a testament to the idea that simple, high-quality ingredients can create something truly extraordinary. While it might seem intimidating, baking a Classic New York cheesecake at home is a rewarding experience that brings a taste of the Big Apple right into your kitchen.
This guide is here to walk you through every step of the process. We will cover a detailed, foolproof recipe, share essential tips for avoiding cracks and achieving that perfect texture, and answer some of the most common questions about making this legendary dessert. Whether you’re a first-time baker or a seasoned pro, you’ll find everything you need to create a showstopping cheesecake.
What Makes a New York Cheesecake Special?
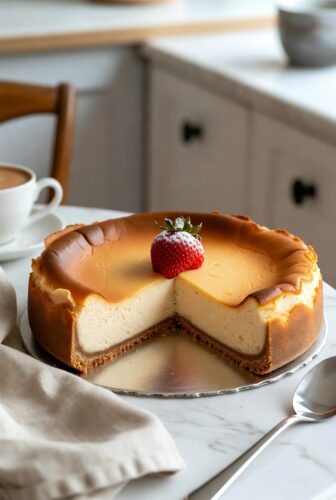
Before we dive into the recipe, let’s explore what defines a Classic New York cheesecake. Unlike other cheesecakes that might use mascarpone or ricotta, the New York version is all about full-fat cream cheese—and lots of it. This is what gives it its signature dense, heavy, and velvety consistency.
Another key component is the addition of sour cream or heavy cream to the batter. This not only adds a subtle, pleasant tang that cuts through the richness but also contributes to the smooth, creamy finish. The result is a dessert that’s decadent and substantial, with a flavor that’s both rich and beautifully balanced.
Finally, the crust is traditionally a simple graham cracker base, providing a buttery, crumbly counterpoint to the smooth filling. It’s a humble foundation that perfectly supports the star of the show.
The Ultimate Classic New York Cheesecake Recipe
This recipe is designed to be straightforward while delivering authentic results. Follow the steps carefully, and you’ll be rewarded with a perfect cheesecake.
Ingredients
For the Graham Cracker Crust:
- 1 ½ cups (150g) graham cracker crumbs (about 10-12 full sheets)
- ⅓ cup (75g) unsalted butter, melted
- ¼ cup (50g) granulated sugar
- A pinch of salt
For the Cheesecake Filling:
- 32 oz (904g) full-fat block cream cheese, softened to room temperature
- 1 ¾ cups (350g) granulated sugar
- 1 cup (240g) full-fat sour cream, at room temperature
- 2 teaspoons pure vanilla extract
- Juice of half a lemon (about 1 tablespoon)
- A pinch of salt
- 5 large eggs, at room temperature
Instructions
Step 1: Prepare Your Pan and Oven
Preheat your oven to 350°F (175°C). Prepare a 9-inch springform pan by wrapping the outside base and sides with a double layer of heavy-duty aluminum foil. This will create a watertight seal for the water bath later. Lightly grease the inside of the pan.
Step 2: Make the Graham Cracker Crust
In a medium bowl, combine the graham cracker crumbs, melted butter, granulated sugar, and salt. Mix until the mixture resembles wet sand. Press the crumbs firmly and evenly into the bottom and slightly up the sides of the prepared springform pan. Use the bottom of a measuring cup to pack it tightly. Bake the crust for 10 minutes. Once baked, let it cool completely on a wire rack.
Step 3: Reduce Oven Temperature
After the crust is done, reduce the oven temperature to 325°F (160°C).
Step 4: Prepare the Cheesecake Filling
In the large bowl of a stand mixer fitted with the paddle attachment (or using a hand mixer), beat the softened cream cheese on medium-low speed until it is completely smooth and free of lumps, about 2-3 minutes. Scrape down the sides and bottom of the bowl frequently. This step is crucial for a lump-free cheesecake.
Add the granulated sugar and salt, and continue to beat on low speed until combined and smooth. Be careful not to overmix or incorporate too much air.
Add the sour cream, vanilla extract, and lemon juice. Mix on low speed until just incorporated. Remember to scrape the bowl again to ensure everything is evenly mixed.
Step 5: Add the Eggs
Add the room temperature eggs one at a time, mixing on low speed after each addition until the yolk just disappears. Do not overbeat once the eggs are in, as this is a primary cause of cracks. The final batter should be smooth and velvety.
Step 6: Assemble and Bake in a Water Bath
Pour the cheesecake filling over the cooled crust and smooth the top with a spatula. Place the foil-wrapped springform pan into a larger roasting pan.
Carefully pour hot water into the roasting pan, ensuring it comes about halfway up the sides of the springform pan. The water bath (or bain-marie) provides moist, even heat, which is the secret to a creamy, crack-free Classic New York cheesecake.
Carefully transfer the roasting pan to the oven. Bake for 90 minutes at 325°F (160°C). The cheesecake is done when the edges are set, but the center 2-3 inches still have a slight wobble (like Jell-O). It will continue to cook and set as it cools.
Step 7: Cool the Cheesecake Slowly
Turn off the oven, but leave the cheesecake inside with the oven door cracked open for 1 hour. This slow cooling process helps prevent cracks from forming due to a sudden temperature change.
After an hour, remove the cheesecake from the water bath and the oven. Remove the foil and let it cool completely on a wire rack at room temperature.
Step 8: Chill
Once at room temperature, cover the cheesecake with plastic wrap and transfer it to the refrigerator. Chill for at least 8 hours, but preferably overnight. This final chilling period is essential for the cheesecake to fully set and for its flavors to meld and deepen.
Tips for the Perfect Cheesecake Every Time

Making a Classic New York cheesecake can feel like a high-stakes baking project, but these tips will help you succeed.
- Use Room Temperature Ingredients: This is non-negotiable. Cold cream cheese will result in a lumpy batter, and cold eggs can cause the mixture to curdle. Take everything out of the fridge at least 2 hours before you begin.
- Don’t Overmix the Batter: Overmixing, especially after adding the eggs, incorporates too much air. This air expands during baking and then collapses as it cools, leading to cracks. Mix on low speed and only until ingredients are just combined.
- Scrape the Bowl Often: To ensure a homogenous, smooth filling, scrape the sides and bottom of your mixing bowl frequently. Hidden lumps of cream cheese are the enemy of a perfect texture.
- Embrace the Water Bath: The water bath is your best friend for cheesecake baking. It regulates the temperature, provides moisture, and ensures the cheesecake bakes gently and evenly. Don’t skip this step!
- Cool It Down Slowly: Drastic temperature changes cause contraction, which leads to cracks. The two-stage cooling process—first in the turned-off oven, then at room temperature—is vital.
- Patience is a Virtue: The overnight chill is crucial. It allows the cheesecake to set completely and develops a richer, more complex flavor. Don’t rush it.
Frequently Asked Questions (FAQs)
Q1: Why did my cheesecake crack?
Cracks are usually caused by one of three things: overmixing the batter (especially after adding eggs), baking at too high a temperature, or cooling the cheesecake too quickly. Following the tips above will greatly minimize the risk of cracks.
Q2: Can I use low-fat cream cheese or sour cream?
For an authentic Classic New York cheesecake, using full-fat ingredients is essential. Low-fat versions have a higher water content and contain stabilizers that can negatively affect the texture, making it less dense and creamy.
Q3: How do I know when my cheesecake is done baking?
The “wobble test” is the best indicator. The edges of the cheesecake should be firm and lightly golden, but the center (a 2- to 3-inch circle) should still jiggle slightly when you gently shake the pan. It will finish setting as it cools. An over-baked cheesecake will be dry and crumbly.
Q4: How should I store my cheesecake?
Store the cheesecake in the refrigerator, covered. It will keep well for up to 5 days. For longer storage, you can freeze it. To do so, chill it completely, then freeze it uncovered on a tray until firm. Once firm, wrap it tightly in plastic wrap and then a layer of foil. It can be frozen for up to 3 months. Thaw it overnight in the refrigerator before serving.
Q5: What toppings can I use for my cheesecake?
While a Classic New York cheesecake is delicious on its own, it also serves as a perfect canvas for toppings. A simple sour cream topping, fresh berries, a drizzle of chocolate or caramel sauce, or a fruit compote are all excellent choices.
Final Words
Baking a Classic New York cheesecake from scratch is more than just following a recipe; it’s an act of dedication that results in one of the world’s most beloved desserts. The rich density, the subtle tang, and the incredibly creamy mouthfeel make every bite a memorable experience. While it requires patience and attention to detail, the process is straightforward, and the reward is a dessert that will impress anyone lucky enough to get a slice.
So, gather your ingredients, trust the process, and get ready to enjoy the rich, decadent flavor of a truly perfect homemade cheesecake.